I have adopt a temporary price scheme for my cakes and cookies, which, if proven reasonable and if proven that the price nicely covers the cost of the goods, will be adopted for quite some time. Here's what I have at the moment..
Decorated Cookies
Price :
RM 1.50 each for 1.5 inch cookie
RM 3.00 each for 3 inch cookie
(minimum order 50 pcs)
Flavour :
Butter cookies
Gingerbread cookies
Cupcakes without Filling
Price :
Available in box of 9 (RM30), 16 (RM50) and 25 (RM75)
Flavour :
Chocolate
Strawberry swirl
Carrot
Apple spice
Lemon and Coconut
Orange
Lemongrass
Cupcakes with Filling
Price :
Available in box of 9 (RM36), 16 (RM64) and 25 (RM100)
Filling Flavour :
Peanut Butter
Chocolate truffles
Strawberry
Orange marmalade
(Cake choice of either vanilla or chocolate)
Whole Cakes
Price:
RM60 for 1kg cake (decorated)
Flavour:
Chocolate
Strawberry swirl
Carrot
Apple spice
Lemon and Coconut
Orange
Lemongrass
Delivery Charges:
Additional RM10 to RM30 within KL and Selangor
Saturday, June 23, 2007
Saturday, June 16, 2007
Mars Bar Crispy Rice
 I ran out of paper cups and was not in the mood to get personal with the oven. And so I made these. Easy as it comes out of a pot, or pan, or wok. Whatever you use to cook it over fire.
I used..
5 Mars bars (the usual 40 g bar, not the tiny snack size)
4 tablespoons butter
3 1/2 cups crispy rice cereal
7 ounces melted milk chocolate (you can use dark chocolate if you don't want it to be too sweet!)
Some snack size Mars bar for garnishing, if you wish.
1. Chop the Mars bars coarsely.
2. Placed the chopped bars and butter in a pot and stir over low heat until they become smooth and creamy.
3. Stir in the rice bubbles. Make sure they are coated with chocolate thoroughly.
4. Press mixture into a sheet pan, or alternatively you can press them into individual baking cups, paper cups, that is.
5. Spread the top with melted chocolate, top with the snack size Mars bar (cut into smaller slices) and refrigerate until set.
Have fun!
Friday, June 15, 2007
First Cupcake Order
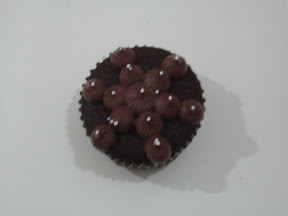
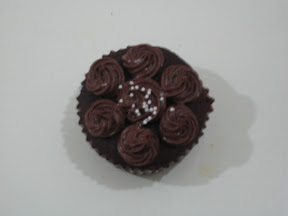
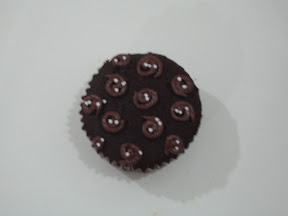
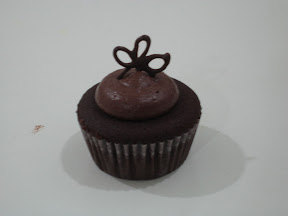
 Farrah ordered some cupcakes. So, hurray to me because that was my first cupcake order. She wanted the Classic Vanilla with Peanut Butter Filling Cupcakes with decorations like the one I gave Zac for her daughter's birthday. Farrah however, opted for a different colour scheme, white, purple and pink.
 I didn't have any royal icing flowers in stock for those colours she wanted. I thought I was going to made some for this project,but I decided against that because royal icing would take a few days to really be hard and ready. Therefore, I made some simple chocolate piped flowers instead. And I think they are just cute..
 I melted some white chocolates using the double boiling method, divide the whole batch into three smaller batches and coloured them purple, pink and white. I then piped the coloured, melted chocolate into small flowery shape onto some tracing sheets and placed them in the fridge to set.
 For the rest of the frosting, the Perfect Buttercream Icing came into action again. And then they are ready to go!
Sunday, June 10, 2007
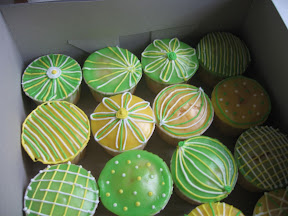
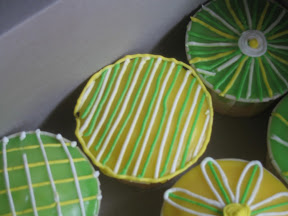
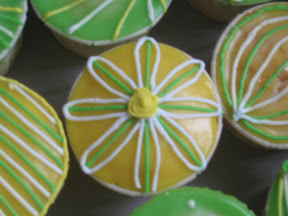
Coconut & Lemon Cupcakes
 A friend is throwing a party for his child's birthday today and I made some cupcakes. At least that was about all I could give since you know, I'm not working...
I modified the recipe to make it less sweet. Too much sugar ain't healthy, see. Here it is.
Coconut & Lemon Cupcakes
1/2 cup butter, softened
2 teaspoons finely grated lemon peel
2/3 cup sugar (make it 1 cup if you want them sweet)
2 eggs
1/3 cup milk
3/4 cup unsweetened shredded coconut
1 1/4 cups cake flour
1/2 teaspoon baking powder
1/2 teaspoon baking soda
1. Beat the butter, lemon peel, sugar and eggs until light and fluffy.
2. Stir in milk and coconut.
3. Fold in the flour.
4. Bake them for like, say..half an hour. Don't forget to check on the doneness.
I iced the cakes with the frosting from the Perfect Buttercream Recipe. And they're done! Easy peasy..

Thursday, June 7, 2007
Saty's Lemon Cheesecake
 Saty made a lemon cheesecake yesterday. She used some secret recipe which I can't publish without her consent. The only thing I could tell is that she used some wholemeal biscuit for the base of the cheesecake. The cake do not require any baking, you just have to refrigerate it. It gave a good lemony taste to pair up with the crispy biscuity base. Tasty!
Wednesday, June 6, 2007
A Belated Birthday
 I made a carrot cake yesterday. It wasn't the best carrot cake recipe but I tried it anyways. I won't be writing recipe for this, because, like I said, it is not the best. Still, I like the taste of the cake.
I love the topping which was cream cheese. And because I think the topping is one of the best I've ever tasted, here's the recipe.
Yummy Cream Cheese Topping
1 cup cream cheese (at room temperature)
1/2 cup butter (softened)
2 tablespoon whip cream
1 teaspoon vanilla essence
2-3 cups icing sugar (depending on how much you need to flavour and to reach desired consistency)
1. Cream the cheese, butter, vanilla essence and whip cream together in a bowl.
2. When the cream turned fluffy, add in the icing sugar, a cup at a time until you get the type and taste that work best for you.
I decorated the cake especially for my sister, Saty, whose birthday was a week ago when I didn't have the time for baking.
Saturday, June 2, 2007
Devil's Food Cake

It's a marathon! After completing the birthday cake, I decided to bake a Devil's Food for our own consumption. I've been pestered by my sister, my mom and also, my boyfriend.
So here's the devil..
Devil's Food Cake
165 g (1 cup) cake flour
90 g (1/3 cup) cocoa powder
1 teaspoon bicarbonate of soda
250 g (1 1/4 cup) caster sugar
2 eggs, lightly beaten
250 ml (1 cup) buttermilk
1 teaspoon vanilla essence
125 g (1/2 cup) softened butter
1. Mix the butter, egg, milk and essence in one bowl.
2. Mix the dry ingredients; flour, cocoa, sugar and soda in another bowl.
3. Combine the two mixture and beat them up with a mixer for 5 minutes or until the mixture is fluffy and all the clumps are smoothed out.
4. Bake for an hour or until the cake is totally done at 180 C.
Chocolate Ganache
60 g (1/4 cup) unsalted butter
60 g dark chocolate
60 g white chocolate, melted
As usual, I sliced the cake into two horizontal layer. I whipped up some 4 fl oz of whip cream and simply spread the cream on top of one layer and put the other layer over.
The dark chocolate and the butter are melted together and then spread onto the cake. And before the dark choc set, I piped circles with the melted white chocolate on the cake, starting from the centre. With a skewer or a toothpick, quickly drag the skewer from the centre to the outside of the cake. Do it all around like a clock.
And then I placed two Hershey's nuggets at the centre. :)
Friday, June 1, 2007
Birthday Cake-Second Order
 I made another birthday cake today for a little boy who just turned 3. I was determined to make this cake a better produce than the earlier one. I was not a fan of multi-coloured cake, but I had to opt for many colours because my mom said, "It's for a kid. It should be colourful." And so I obliged.
Madeira Apple Cake
250g butter
250g caster sugar
5 eggs
240g cake flour
1 teaspoon baking powder
1 teaspoon soda bicarbonate
1 tablespoon milk
2 apples (peeled, cored and grated)
60g ground almond
1/2 teaspoon mixed spice
1. Beat the butter and sugar in a mixing bowl until light and fluffy.
2. Add the eggs one at a time, beating well after each addition.
3. Fold in the flour, then add in the milk. Mix nicely.
4. Add in the grated apples, mixed spice and ground almond. Fold them altogether untill well mixed.
5. Pour the batter into a baking pan and baked for 1 hour and 25 minutes at 180 C. Check for doneness as usual.
 I leveled the cake and divide them into two horiaontal layer after it is cooled. I glazed the top of the first layer with apricot glaze (you can also use jam). Then, I spread on the almond filling.
Almond Filling
10 fl oz thick cream
60g ground almond
1 tablespoon icing sugar
1. Whip the cream and the sugar in a bowl until fluffy. Make sure you do not overbeat.
2. Fold in the almond.
 I found another great buttercream recipe which is perfect for icing whole cakes. It is not too sweet and has a perfect texture. You can also adjust the consistency to your needs. I used this recipe for this birthday cake. This recipe made enough to cover and decorate one 8 inch cake.
The Perfect Buttercream
1 cup shortening
4 tablespoons butter (you can use all shortening to make a stiffer icing, but butter makes it tastier)
2-4 tablespoons heavy whip cream
1 teaspoon vanilla
2-4 cups icing sugar
1. Beat the shortening until smooth. Add the butter (if you are using some) and beat together until smooth, light and fluffy.
2. Add smaller amount of heavy cream in the recipe and the vanilla. Mix well.
3. Add in half the icing sugar, one cup at a time and beat for 5 minutes on low-medium speed.
4. Adjust the sweetness and the consistency of your icing with the icing sugar and the whip cream. Add more sugar if you want it stiffer and add more whip cream for a more runny texture.
Lazy White Chocolate Cupcake
 I was lazy when I got home from the States. But I still wanted to make some cupcakes because I miss baking so much. Plus, Pearl bought me a new recipe book that made me eager to try the white chocolate cake recipe.
However, my fatigue must have affected the cakes I made that day. I didn't give it enough white chocolate for the batter and I skip one ingredient; coconut extract because I was too lazy to go out and buy some. So the cake was indeed a failure. The frosting on the other hand, tasted perfect. Not sweet, but yet creamy. No doubt I was lazy with the decorations too, but the point is, I finally found the perfect frosting.
And because the cake was a failure, I'll skip the cake recipe and post the frosting recipe instead.
French Buttercream Icing
2/3 cup sugar
1/4 cup flour
1/4 teaspoon salt
3/4 cup milk (add this gradually to reach the right consistency)
1 cup cold butter
1. Mix sugar, flour and salt in a saucepan.
2. Pour in half of the milk and cook over medium heat.
3. Stir constantly until very thick and adding the rest of the milk until you get the consistency you want. It is good to make it very thick and stiff because you'll be adding the butter later on to the mixture.
4. Cool the mixture to room temperature.
5. Add 1/2 cup butter at a time and beat at medium-high speed until smooth.
6. Add vanilla and beat well.
7. Chill the icing before decorating.
Monday, April 30, 2007
Not My Grandma's Gingerbread Cookies
 |
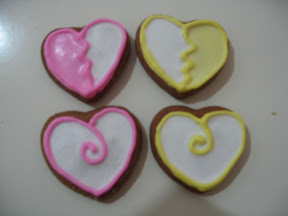
| Our favourite line up. |
 |
First few trials.. |
Not My Grandma's Gingerbread Cookie
4 cups cookie flour
1 teaspoon baking soda
1 teaspoon salt
3 teaspoons powdered ginger
1 teaspoon cinnamon
1 teaspoon nutmeg
2 teaspoon mixed spice
1 cup shortening
1 cup granulated sugar
1 1/4 cups molasses
2 eggs, beaten
1. Preheat oven to 375 F. Thoroughly mix flour, soda, salt and spices.
2. Melt shortening in a saucepan. cool it slightly before adding the sugar, molasses and eggs into it. Mix them well.
3. Add 4 cups of dry ingredients and knead it to make a firm dough. Add more flour if necessary.
4. Like all other regular cookies, roll the cookie dough to 1/4 inch thick and cut the shapes out using cookie cutter.
5. Bake 10-15 minutes.
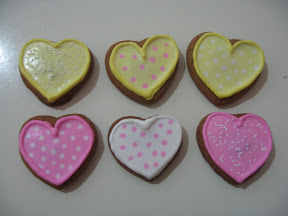 |
| Various dots.. |
We decorated the cookies with royal icing. Here, we used two types; soft peak consistency for lining out the design and runny type royal icing for filling up/coloring the design.
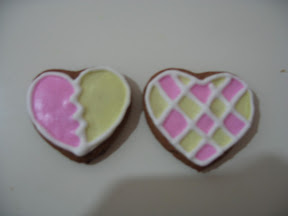 |
| Broken heart, checked heart. |
Royal Icing
3 tablespoons meringue powder
4 cups confectioners' sugar
6 tablespoons water
1. Beat all ingredients at low speed for 7-10 minutes until icing forms peaks. This made the soft peak consistency.
2. To make them runny, in order to fill up the border, add 2 tablespoons more water to the already soft icing.
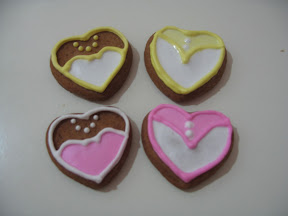 |
| Tux and evening gown.. |
Overall, we are both happy with these cookies. Later we'll pack them up in individual plastics and tie them up with ribbons.
Lemon Cream Cupcake Gone Wrong
Last week, we made some cupcakes. We planned to had them filled with lemon cream cheese and made some fillings for that purpose. I used a different method of filling; I first filled quarter of the papercups with the cake batter, scooped the filling and put it in the middle, then filled the rest with cake batter up to 3/4 cup full. They were then baked.
Saty wanted the cakes to be covered with fondant icing, so we made some liquid fondant and also some royal icing for piping details on the fondant topped cakes later.
And the result? Hahah..The cakes tasted alright and the lemon cream filling is delicious, only that I've placed them too little on each cake. The poured fondant looks great but tasted funny, most probably because of the almond extract I put in. The design wasn't so bad though.
I won't publish the recipe this time, not until I've got them right and perfect.
Saty wanted the cakes to be covered with fondant icing, so we made some liquid fondant and also some royal icing for piping details on the fondant topped cakes later.
 |
| The Mistaken Line Up |
 |
| The Mistaken |
 |
| The best among the worst.. |
Monday, April 16, 2007
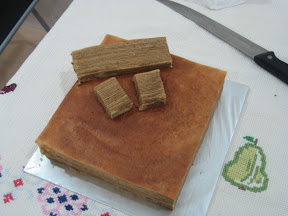
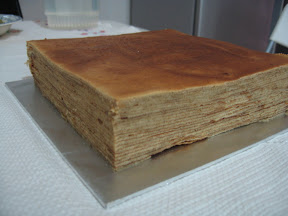
Chai Spice Layer Cake
Today was layer cake day. Mak has been pestering me on making this particular layer cake for months and finally, I agreed to do it for her. And here's my Chai Spice Layer Cake. I modified a recipe from the native Sarawak layer cake recipe and add a suitable amount of Chai Spice into the batter and made sure that the flavour was more intense than the usual store bought layer cakes.
Chai Spice Layer Cake
A
25 egg yolks
4 egg whites
200 g caster sugar
180 g Hong Kong flour
1 tablespoon ovalette
B
400 g butter
4 tablespoons condensed milk
1 teaspoon vanilla
C
4 teaspoons Chai spice
1. Beat all ingredients in A without the flour until white and fluffy.
2. Fold in the flour thoroughly.
3. Also beat ingredients in B until light then mix both A and B in a large bowl.
4. Mix the batter well.
5. Add in the Chai spice and stir it in and ensure the spive is distributed evenly throughout the batter.
6. Heat oven on grill mode at 180 C.
7. Layer the batter one thin layer at a time as per my previous method of baking a layer cake.
Once you're done with the cake, remember to leave it to cool in the cake pan. Then turn it over on a wire rack, trim the sides and it's ready to be eaten. Simply delicious. And it can be kept in the fridge for 1 week without losing its moisture.
 |
| The proud Chai Spice Layer Cakes. |
Chai Spice Layer Cake
A
25 egg yolks
4 egg whites
200 g caster sugar
180 g Hong Kong flour
1 tablespoon ovalette
B
400 g butter
4 tablespoons condensed milk
1 teaspoon vanilla
C
4 teaspoons Chai spice
1. Beat all ingredients in A without the flour until white and fluffy.
2. Fold in the flour thoroughly.
3. Also beat ingredients in B until light then mix both A and B in a large bowl.
4. Mix the batter well.
5. Add in the Chai spice and stir it in and ensure the spive is distributed evenly throughout the batter.
6. Heat oven on grill mode at 180 C.
7. Layer the batter one thin layer at a time as per my previous method of baking a layer cake.
 |
| From the outside, it seems like the layers were not well defined.. |
Once you're done with the cake, remember to leave it to cool in the cake pan. Then turn it over on a wire rack, trim the sides and it's ready to be eaten. Simply delicious. And it can be kept in the fridge for 1 week without losing its moisture.
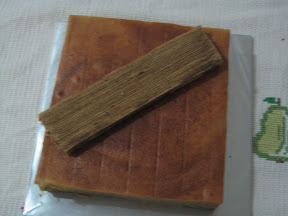 |
| But once I cut it, the layers were more obvious and were really, really fine and thin. Thanks to Mak who insist that I make it as thin as possible. |
Sunday, April 15, 2007
Mocha Cupcakes With Chocolate Cream Cheese Frosting
|
| Cupcakes all lined up. |
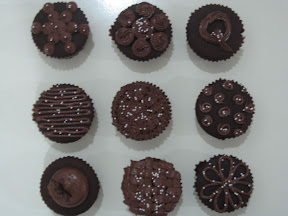
Today my sister and I had a little breakthrough. Our icing is finally not too sweet. These cupcakes was made with a friend in mind, Sara. She and I often do rounds of coffee together while bitching about life. Thus these mocha cupcakes was made.
 |
| And this one,was by Saty. She's good at it. |
Mocha Cupcakes
2 2/3 cups cake flour
1 cup cocoa powder
2 teaspoons baking powder
1 teaspoon baking soda
1/2 teaspoon cinnamon powder
3 teaspoons instant coffee powder
1 cup hot water
2 teaspoons vanilla
1 cup milk
1 cup butter
2 cups sugar
2 eggs
1. Beat the butter and sugar until light and fluffy.
2. Add in the eggs and continue beating until thoroughly mixed. In another bowl, mixed the dry ingredients; flour, cocoa powder, baking soda and powder, salt, and cinnamon powder.
3. Add 1/2 of the flour mix into the butter sugar mixture. Dilute the instant coffee powder with the hot water and pour into the batter. Mix well.
4. Fold in another half batch of the flour mix, and finally stir in the vanilla and milk.
5. Pour batter into lined muffin tins 2/3 full. Bake at 180 C for 30 minutes or until toothpick test is satisfactory.
 |
| Saty did this one too. |
Chocolate Cream Cheese Frosting
6 oz cream cheese
1 cup icing sugar (the recipe said 2 cups, but we reduced it so it won't be too sweet, and add some cocoa powder instead. If you like it sweet, add in a cup more icing sugar. The cocoa powder is optional and you'll probably need less of it).
6 oz bittersweet chocolate (melted over simmering hot water)
3 tablespoons milk
1 teaspoon vanilla
5-8 teaspoons of cocoa powder
1. Cream the cheese and icing sugar in a bowl.
2. Beat in the melted chocolate, then followed by the milk and vanilla.
3. Add in the cocoa powder, a teaspoon at a time, beating well after each addition until you reach the consistency you like for the frosting.
 |
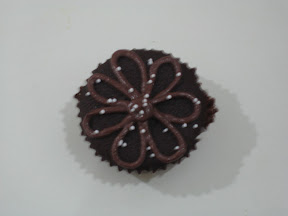
| I wasn't so creative with the toppings. But this one was made by myself. |
We iced the cooled cupcakes with the frosting, and my sister Saty went crazy with the toppings. She's creative, but often lose focus if she had to do too many. Haha..but thank god she has the interest in decorating cakes if not making them.
 |
| Cute little swirls. Always by Saty. |
After we've iced all the cupcakes, we still got some frosting left, so I stored them in the fridge just to see if the frosting freezes well. Will try to use it again for the next project.
 |
| Ahh..but this one's mine. Simple, but I love it. |
For Sara, I did nine of the above design and put them in a cake box, secured by sections made from corrugated paper. Take a look at them..
Friday, April 6, 2007
Classic Vanilla With Peanut Butter Filling Cupcakes
 I had some extra white buttercream from the last birthday project. So I decided to make some cupcakes and use the buttercream for topping. I was in an upbeat mood yesterday and I decided to try new things on my cupcakes. I chose to fill my cupcakes with some peanut butter filling. I modified some truffle making recipes to this delicious, creamy filling.
Classic Vanilla Cupcakes
1 cup salted butter
2 cups sugar
4 eggs
2 3/4 cups cake flour
1 teaspoon baking powder
1/2 teaspoon bicarbonate soda
1 cup milk
2 teaspoon vanilla
1. Cream the butter on high speed mixer for 30 seconds.
2. Add in the sugar and beat further for 3 minutes.
3. Add in eggs, one at a time, beat for about 30 seconds after adding in each egg.
4. Fold in the flour, baking powder and soda until thoroughly mixed.
5. Pour in the milk and vanilla and stir until a smooth batter is formed.
6. Pour the batter into lined muffin tins 1/2 full. This cake rise like crazy, so be careful not to fill more than 2/3 of the cup.
7. Bake in the oven for 25 minutes on 350 F. Always test cake for doneness.
Note : This cake tasted great, but the cake pulls away from the paper cups upon cooling. Not a good thing for putting fillings in. I definitely won't use this recipe for cupcakes next time.
Peanut Butter Filling
1/2 cup creamy or chunky peanut butter
1 1/2 tablespoon butter
2 tablespoon milk
1. Cream the butter and peanut butter until thoroughly mixed.
2. Add in the milk and mix them again until it forms a creamy texture, not too stiff and not too runny. Have a taste at the finish product, if you want it sweeter, you can always add some sifted confectioners' sugar to the mixture.
Putting Them All Together
1. After the cakes are slightly cooled, I cored the middle section of the cakes with a small knife, leaving a hollow centre. Do not discard the cored section, you need it to cover back the cakes after putting in the fillings.
2. Now fill the cakes with approximately 1 teaspoon of the filling, more if the hole you made is bug and lesser if it is small.
3. Cover it back with the cored section. You will need to cut off the lower part of the cored section so you are left with just the top part of the section.
4. I tint the buttercream light brown and some 2 tablespoons of the same buttercream in leaf green. I also made some apple blossoms from yellow fondants to be used in garnishing.
5. Using a spatula, spread the icing smoothly on top of the cupcakes. I centred the apple blossoms on each cake, piped 2 buttercream leaves for each blossom and voila! My cupcake is done!

I am very happy with the taste of the cake and the peanut butter filling, but I am still not satisfied with the buttercream. It didn't taste bad, but I'm still looking for a way to improve it.
Friday, March 30, 2007
1st Birthday Cake
A relative's children will be celebrating their birthdays tomorrow. They asked me if I could help with preparing the birthday cake so I quickly said ok. And because my skills are limited, plus this will also be a chance for me to try if I do have a bit of skill in cake-making, I offered them to do it for free.


I started baking the cake (I baked two), using the Moist Orange Butter Cake. Here's the recipe (for 1 cake)..
Moist Orange Butter Cake
250 g salted butter
8 oz cake flour
7 oz caster sugar
4 eggs
orange cordial (I used Sunquick)
grated peel of 1 orange
vanilla essence
1 teaspoon baking soda
1 1/2 teaspoon baking powder
1/4 cup water
1. Beat the butter with sugar in a bowl until fluffy.
2. Add in the eggs one at a time and beat well after each addition.
3. In another small bowl mix baking sodas, baking powders, orange cordial and water. Let stand for a minute.
4. Add in the flour alternately with the soda mixture into the butter batter in three parts.
5. Mix well after each addition to ensure proper folding of flour into batter.
6. Pour into lined cake tin and bake for 45 minutes at 350 F. Always check doneness with cake tester.
After cooling the cake on the grid for at least an hour, I levelled off the top so it'll be easier for me to ice the cake. I glazed the tops and the sides of the cake with some apricot glaze, ready to be decorated.
I prepared some white buttercream icing, coloured some piping gel in red and yellow, and mixed some melted dark chocolate with glycerine. Recipe for buttercream icing below based on Wilton's recipe.
White Buttercream Icing
1 cup shortening
4 cups confectioners sugar
1 teaspoon vanilla essence
4-6 tablespoons milk (depending on the consistency needed to ice the cake)
1. Beat the shortening until slightly fluffy.
2. Add in the vanilla essence and mix thoroughly.
3. Then, add the sugar, one cup at a time and beat it well. Make sure you scrape the side and bottom of the bowl frequently to ensure proper mixing.
4. Icing will appear dry after adding in the fourth cup, but don't panic. It's time to add in the milk. For icing cakes you will need a thin consistency icing but for decorating and making shapes and flowers, you will need stiffer icing.
Decorating Phase
Spread some buttercream on the top of one cake first and arrange some fruit cocktails on the icing layer. Place the second cake on top the first one. Start icing the whole cake, from top to its side. I found this very tedious as it is quite difficult to spread the icing smoothly onto the cake. I had to dip the spatula over and over again into a glass of hot water. I then combed the sides of the cake so it won't look so messy. I piped star border all around the bottom edge and top edge. I also imprinted the words and shape of flowers and heart on the cake top.
With the melted chocolate, I piped out the words and the lining of the decorative shapes. I then filled in the shapes with coloured piping gel. I have made some chocolate flowers last week, from melted chocolate. This chocolate could last for months and came in handy at times like this. So I simply place the chocolate flowers on the sides and a few scattered on top. And here's the final product.
Pretty ugly I'd say but quite alright for someone who doesn't go for baking nor decorating classes. I'll definitely try this again. But at the meantime, I kinda miss baking cupcakes. I'm gonna do that next. They're much easier to handle.
Saturday, March 3, 2007
I've Never Cooked My Own Fried Noodles
I have decided today that it is time for me to learn how to fry my own fried noodles. So I've asked Mak to guide me along. This is the simplest way..
Mom's Regular Fried Noodles

5 pips of garlic, blended
1 huge bulb of onion, blended
2 tablespoons chilli paste
1/2 cup of diced boneless chicken
5 fishballs, each cut into 2
10 fresh prawns, shells peeled
1/2 cup of boiled cockles, without the shell of course
2 stalks of mustard leaves, cut into bite size
4 tablespoons cooking oil
3 tablespoons dark soy sauce
1 egg
2 teaspoons salt, adjust to taste
1 tablespoon sugar
1 cup of water
1 packet of yellow noodles
Heat oil in a wok. Sautee the garlics and onion until you can smell the aroma. Add on the chilli paste, fry on till the colour turns a bit darker. Stir in the soy sauce. Add in the chicken and let it cook slightly. Then put in the prawns, cockles and fishballs. Pour in the water and adjust the taste with salt and sugar. Add the egg and stir quickly so that the sauce becomes thick. Bring the sauce to boil. Ensure you do not use low fire. Just then, add in the noodles and the mustard leaves. Fry on until everything is well mixed and the sauce dries up to your liking.
Strawberry Layer Cake
Today I was asked to bake cakes for some relative's. Their daughter is getting married. So I made this layer cake after not making it for many, many months. I used to be crazy about baking layer cakes last year, until the moment I fell in love with cupcakes.

Strawberry Layer Cake
Ingredient A
20 egg yolks
6 egg whites
175g granulated sugar
125g Hong Kong pow flour
Beat up eggs and sugar until light and fluffy or until they turn almost white. Fold in the flour in 3 batches, mixing them well after each addition.
Ingredient B
400g butter, softened
1 tablespoon ovalette
4 tablespoons condensed milk
1 teaspoon vanilla essence
Beat all of the above ingredient until butter is slightly fluffy. Combine it good with mixture A. Divide the whole batter equally into 2 portions. Prepare your oven to 180 degree Celcius on grill mode. (Using grill mode is quite necessary in making layer cakes, so if your oven don't have such mode it is quite impossible to succeed. I've tried once, the layers couldn't brown well and the bottom part will be burned once I put on the last layer). Don't forget to line the bottom of your cake pan (for this I use 8 x 8 x 4 cake tin) with parchment paper and grease it proper, base and all around.
Ingredient C
100g ice cream powder
1 tablespoon strawberry paste
1 teaspoon pink food colouring
In one portion of the batter, add in the ice cream powder, strawberry paste and the food colouring.
Now that you have 2 parts of batter, one pink and the other one not, scoop 1 cup of the original batter and even the layer out in the pan. Bake it in the preheated oven for no longer than 3 minutes or until you see the surface has nicely browned. Bring the pan out and scoop the next cup of pink batter and even it out on top of the first layer. Place it back in the oven and wait for the same browning effect. (Yes, it's tedious.I know...)Keep repeating this process, alternating the batter on top of each other until you have used up all the batter. You should get 10 layers in total.
After completing the last layer and the surface has browned nicely, check the doneness of the cake by doing the regular toothpick test. If some batter is still visible on the toothpick, turn the oven off and leave the cake in the heat for another 15 minutes. Let it cool in the pan before transferring it onto plate or box or whatever..
Reminder : You should never leave your baking unattended. Have all your needs and the batters next to you in front of the oven.

P/s : My problem with the cake is that I can't seem to get rid of the air bubbles. They spoil the look of the cake by ending up looking like cheese. I've tried so many remedy but they still make an appearance. But nevertheless, the cake is soft, moist and delicious.
Sunday, February 25, 2007
Devil's Food with Orange Buttercream

This was my second attempt of making cupcakes. The result was a whole lot of delicious chocolatey cupcakes with an almost perfect frosting, accept it was a bit too sweet (the frosting). Saty has started work again after her long confinement. So I had the kitchen all to myself. She was a tad bit unhappy because she missed the frosting making part.
I made the cupcakes a day in advance. The cupcake recipe was adapted from the Divine Devil's Food Cupcake by Linjen, which I found on Recipezaar. Actually it was just a minute adjustment and the cupcakes tasted really good. The recipe for Orange Buttercream Icing was taken from Wilton Cupcake Fun. Here's the complete adapted recipe for my second trial of cupcake baking.
Ty's Food for The Devil Cupcakes
2 cups cake flour
2/3 cup Van Houten cocoa powder
1/2 teaspoons baking soda
1 teaspoons baking powder
1/2 teaspoon salt
1/2 cup low-fat buttermilk
3/4 cup light butter, softened
1/3 cup water
1 3/4 cups sugar
2 large eggs
1 1/2 teaspoons vanilla
1. Heat oven to 180 degrees C. Line 24 regular size muffin cups with paper liners.
2. Mix flour, cocoa, salt baking powder and baking soda in large bowl. Combine buttermilk
and water in small bowl. Beat butter in another large bowl with mixer on medium high speed
until fluffy.
3. Add sugar and beat on until you don't feel nor see anymore sugar granules. Add eggs, one at a
time, beating well after each addition. Add in vanilla. Alternately add flour and buttermilk in 3
batches, beating just until blended. Spoon into cups, 1/2 to 2/3 full. Bake 20 - 25 minutes or
until toothpick comes out clean. Cool in pan on wire rack 5 minutes and then remove to a rack
and cool completely.

Orange Buttercream Icing
I made the cupcakes a day in advance. The cupcake recipe was adapted from the Divine Devil's Food Cupcake by Linjen, which I found on Recipezaar. Actually it was just a minute adjustment and the cupcakes tasted really good. The recipe for Orange Buttercream Icing was taken from Wilton Cupcake Fun. Here's the complete adapted recipe for my second trial of cupcake baking.
Ty's Food for The Devil Cupcakes
2 cups cake flour
2/3 cup Van Houten cocoa powder
1/2 teaspoons baking soda
1 teaspoons baking powder
1/2 teaspoon salt
1/2 cup low-fat buttermilk
3/4 cup light butter, softened
1/3 cup water
1 3/4 cups sugar
2 large eggs
1 1/2 teaspoons vanilla
1. Heat oven to 180 degrees C. Line 24 regular size muffin cups with paper liners.
2. Mix flour, cocoa, salt baking powder and baking soda in large bowl. Combine buttermilk
and water in small bowl. Beat butter in another large bowl with mixer on medium high speed
until fluffy.
3. Add sugar and beat on until you don't feel nor see anymore sugar granules. Add eggs, one at a
time, beating well after each addition. Add in vanilla. Alternately add flour and buttermilk in 3
batches, beating just until blended. Spoon into cups, 1/2 to 2/3 full. Bake 20 - 25 minutes or
until toothpick comes out clean. Cool in pan on wire rack 5 minutes and then remove to a rack
and cool completely.
Orange Buttercream Icing
1/2 cup solid vegetable shortening
1/2 cup butter or margarine
1 teaspoon Clear Vanilla Extract
4 cups sifted confectioners' sugar (approx. 1 lb.) 1 teaspoon Sunquick Orange cordial
2 tablespoons buttermilk
Zest of 1 orange, grated
2 drops of Orange Oil
Orange Icing Color (optional)
1. Beat butter and shortening with electric mixer.
2. Add vanilla.
3. Gradually add sugar, one at a time, beating well on medium speed.
4. When all sugar has been mixed in, add buttermilk and beat at medium speed until light and fluffy.
5. Stir in orange zest, orange cordial, orange oil and icing colour.
6. Pipe the icing on the cupcakes and add a few orange chocolate chips on top.
Friday, February 23, 2007
Our First Cupcake


After seeing a friend buying a box of beautiful, cute cupcakes, I fell in love and am now so keen to make my own. Furthermore after browsing hundreds of cupcakes' blogs and web pages, I am getting more and more crazy about cupcakes!
And so, last week my sister and I, in a haste, went on our first time ever experience on making our cupcakes. We were not prepared, as I just got home from Denver.
Therefore, assuming we have everything in the kitchen, we began our project only to find out we are out of granulated sugar. We were too lazy to run to the shop to restock it so we simply used some raw sugar instead.
We used the Lemon Citrus Cupcakes recipe from the book The Artful Cupcake by Marcianne Miller. The recipe requires the usage of lemon and orange zest and juice, which we also did not have. For that, we substituted all the citrus ingredient with some orange oil.
As for the frosting, we used the Classic Buttercream Frosting recipe from the same book. We had to make 2 batches of frosting because one was not enough. We used some ready rolled-fondant to decorate the cupcakes too.
The result : The cake looks alright from far but if you look at it closely, you can see the granules of the raw sugar everywhere on its surface. It taste just alright but if you eat too much, you can taste the bitterness of the orange oil. The second batch of buttercream frosting we made was too buttery in taste, probably because we tried to reduce the amount of confectioners' sugar. We didn't want to make it as sweet as the first batch. The first batch was way too sweet. And we had everything done according to the recipe. The rolled-fondant didn't taste so nice either. I think that's why Chockylit hardly use them in her recipe.
In the looks department however, I have to say that our cupcakes didn't look so bad. Most of the decorating tasks anyways, was done by Saty (my sister).
Subscribe to:
Comments (Atom)
