These were made for a friend's mom who is moving out to a new house.
 I made 50. And that took me all day! These were made for a friend's mom who is moving out to a new house. I made 50. And that took me all day!
 I decided to go simple over the weekend, baking some cupcakes for friends.
 Here's what I did. I don't want to mention this but it's the peanut butter cupcakes again. It's the safest bet to give to friends other than the usual chocolate flavour. Everyone loves chocolate, I know, but nobody really hates peanut butter too.
 The chocolate lattices and sticks was a courtesy made by Pearl. Pearl did some R&D on a new flavour. She made coffee cupcakes soaked in espresso syrup which was terrific! They tasted strong in coffee, bittersweet, a must try for coffee lovers.
 This one here was made for our household consumption. I hope to turn it into cupcakes presentation real soon. At the mean time, I would have to look for some coffee lovers to be the victim.
  My latest attempt was in making some chocolate truffles and placing them in vanilla cupcakes. This one here is made for a birthday girl.
 So happy birthday!
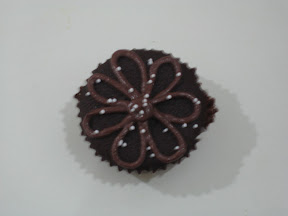
 This one made in different design, is made for a girl, to be presented to her boyriend. The design for this, was solely her idea.
 I'm kinda satisfied with my two latest produce. A little different from what I've done most of the time, yet I'm liking it.
 I made these recently. Nothing new in the recipe department, here is the ever favourite Peanut Butter Filled Cupcakes again in different looks.
 I made these for Wanie's cousin's engagement day.
 The variations..
 Also made some 100 pieces of cookie favors for the engaged couple. I am bad in tying ribbons. So Saty helped with all 100 pieces. Her ribbons are perfect.
 These, are the Lemon Coconut Cupcakes. Again, nothing new. Just a simpler look for the cakes because I was not in the mood for playing with colours. I think this is much better as it is simpler, more contemporary and nice.
 I ran out of paper cups and was not in the mood to get personal with the oven. And so I made these. Easy as it comes out of a pot, or pan, or wok. Whatever you use to cook it over fire.
 Farrah ordered some cupcakes. So, hurray to me because that was my first cupcake order. She wanted the Classic Vanilla with Peanut Butter Filling Cupcakes with decorations like the one I gave Zac for her daughter's birthday. Farrah however, opted for a different colour scheme, white, purple and pink.
 I didn't have any royal icing flowers in stock for those colours she wanted. I thought I was going to made some for this project,but I decided against that because royal icing would take a few days to really be hard and ready. Therefore, I made some simple chocolate piped flowers instead. And I think they are just cute..
 I melted some white chocolates using the double boiling method, divide the whole batch into three smaller batches and coloured them purple, pink and white. I then piped the coloured, melted chocolate into small flowery shape onto some tracing sheets and placed them in the fridge to set.
 For the rest of the frosting, the Perfect Buttercream Icing came into action again. And then they are ready to go!
 A friend is throwing a party for his child's birthday today and I made some cupcakes. At least that was about all I could give since you know, I'm not working...
 Saty made a lemon cheesecake yesterday. She used some secret recipe which I can't publish without her consent. The only thing I could tell is that she used some wholemeal biscuit for the base of the cheesecake. The cake do not require any baking, you just have to refrigerate it. It gave a good lemony taste to pair up with the crispy biscuity base. Tasty!
 I made a carrot cake yesterday. It wasn't the best carrot cake recipe but I tried it anyways. I won't be writing recipe for this, because, like I said, it is not the best. Still, I like the taste of the cake.
 I made another birthday cake today for a little boy who just turned 3. I was determined to make this cake a better produce than the earlier one. I was not a fan of multi-coloured cake, but I had to opt for many colours because my mom said, "It's for a kid. It should be colourful." And so I obliged.
 I leveled the cake and divide them into two horiaontal layer after it is cooled. I glazed the top of the first layer with apricot glaze (you can also use jam). Then, I spread on the almond filling.
 I found another great buttercream recipe which is perfect for icing whole cakes. It is not too sweet and has a perfect texture. You can also adjust the consistency to your needs. I used this recipe for this birthday cake. This recipe made enough to cover and decorate one 8 inch cake.
 I was lazy when I got home from the States. But I still wanted to make some cupcakes because I miss baking so much. Plus, Pearl bought me a new recipe book that made me eager to try the white chocolate cake recipe.
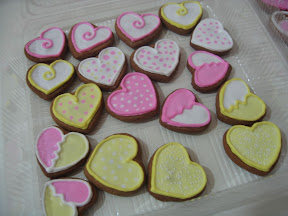 |
| Our favourite line up. |
 |
First few trials.. |
Not My Grandma's Gingerbread Cookie
4 cups cookie flour
1 teaspoon baking soda
1 teaspoon salt
3 teaspoons powdered ginger
1 teaspoon cinnamon
1 teaspoon nutmeg
2 teaspoon mixed spice
1 cup shortening
1 cup granulated sugar
1 1/4 cups molasses
2 eggs, beaten
1. Preheat oven to 375 F. Thoroughly mix flour, soda, salt and spices.
2. Melt shortening in a saucepan. cool it slightly before adding the sugar, molasses and eggs into it. Mix them well.
3. Add 4 cups of dry ingredients and knead it to make a firm dough. Add more flour if necessary.
4. Like all other regular cookies, roll the cookie dough to 1/4 inch thick and cut the shapes out using cookie cutter.
5. Bake 10-15 minutes.
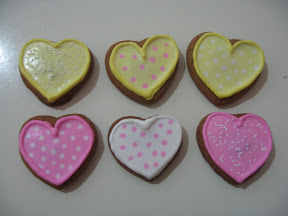 |
| Various dots.. |
We decorated the cookies with royal icing. Here, we used two types; soft peak consistency for lining out the design and runny type royal icing for filling up/coloring the design.
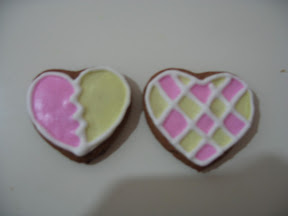 |
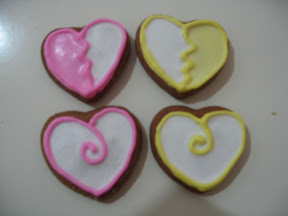
| Broken heart, checked heart. |
Royal Icing
3 tablespoons meringue powder
4 cups confectioners' sugar
6 tablespoons water
1. Beat all ingredients at low speed for 7-10 minutes until icing forms peaks. This made the soft peak consistency.
2. To make them runny, in order to fill up the border, add 2 tablespoons more water to the already soft icing.
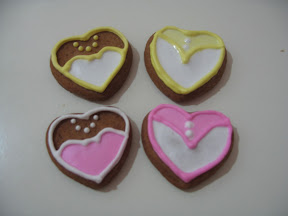 |
| Tux and evening gown.. |
Overall, we are both happy with these cookies. Later we'll pack them up in individual plastics and tie them up with ribbons.
 |
| The Mistaken Line Up |
 |
| The Mistaken |
 |
| The best among the worst.. |
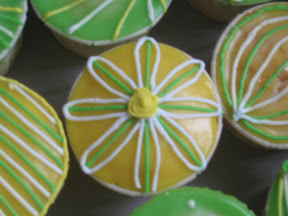
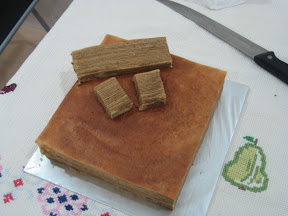 |
| The proud Chai Spice Layer Cakes. |
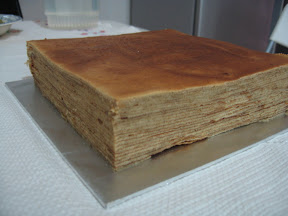 |
| From the outside, it seems like the layers were not well defined.. |
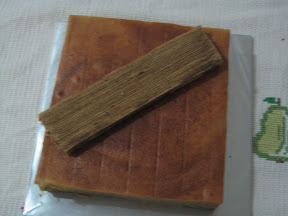 |
| But once I cut it, the layers were more obvious and were really, really fine and thin. Thanks to Mak who insist that I make it as thin as possible. |
|
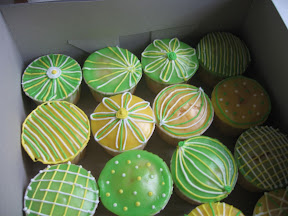
| Cupcakes all lined up. |
Today my sister and I had a little breakthrough. Our icing is finally not too sweet. These cupcakes was made with a friend in mind, Sara. She and I often do rounds of coffee together while bitching about life. Thus these mocha cupcakes was made.
 |
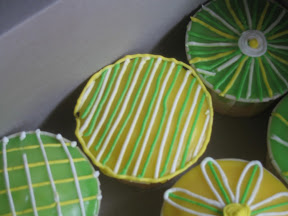
| And this one,was by Saty. She's good at it. |
Mocha Cupcakes
2 2/3 cups cake flour
1 cup cocoa powder
2 teaspoons baking powder
1 teaspoon baking soda
1/2 teaspoon cinnamon powder
3 teaspoons instant coffee powder
1 cup hot water
2 teaspoons vanilla
1 cup milk
1 cup butter
2 cups sugar
2 eggs
1. Beat the butter and sugar until light and fluffy.
2. Add in the eggs and continue beating until thoroughly mixed. In another bowl, mixed the dry ingredients; flour, cocoa powder, baking soda and powder, salt, and cinnamon powder.
3. Add 1/2 of the flour mix into the butter sugar mixture. Dilute the instant coffee powder with the hot water and pour into the batter. Mix well.
4. Fold in another half batch of the flour mix, and finally stir in the vanilla and milk.
5. Pour batter into lined muffin tins 2/3 full. Bake at 180 C for 30 minutes or until toothpick test is satisfactory.
 |
| Saty did this one too. |
Chocolate Cream Cheese Frosting
6 oz cream cheese
1 cup icing sugar (the recipe said 2 cups, but we reduced it so it won't be too sweet, and add some cocoa powder instead. If you like it sweet, add in a cup more icing sugar. The cocoa powder is optional and you'll probably need less of it).
6 oz bittersweet chocolate (melted over simmering hot water)
3 tablespoons milk
1 teaspoon vanilla
5-8 teaspoons of cocoa powder
1. Cream the cheese and icing sugar in a bowl.
2. Beat in the melted chocolate, then followed by the milk and vanilla.
3. Add in the cocoa powder, a teaspoon at a time, beating well after each addition until you reach the consistency you like for the frosting.
 |
| I wasn't so creative with the toppings. But this one was made by myself. |
We iced the cooled cupcakes with the frosting, and my sister Saty went crazy with the toppings. She's creative, but often lose focus if she had to do too many. Haha..but thank god she has the interest in decorating cakes if not making them.
 |
| Cute little swirls. Always by Saty. |
After we've iced all the cupcakes, we still got some frosting left, so I stored them in the fridge just to see if the frosting freezes well. Will try to use it again for the next project.
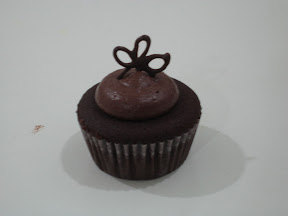 |
| Ahh..but this one's mine. Simple, but I love it. |
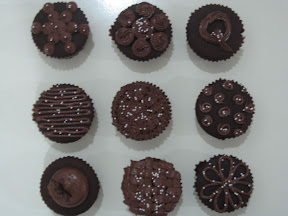
For Sara, I did nine of the above design and put them in a cake box, secured by sections made from corrugated paper. Take a look at them..
 I had some extra white buttercream from the last birthday project. So I decided to make some cupcakes and use the buttercream for topping. I was in an upbeat mood yesterday and I decided to try new things on my cupcakes. I chose to fill my cupcakes with some peanut butter filling. I modified some truffle making recipes to this delicious, creamy filling.